Monday, September 26, 2016

19th century "Lamentation over the Dead Christ" Canvas Painting by a follower of Jusepe de Ribera (1591-1652)


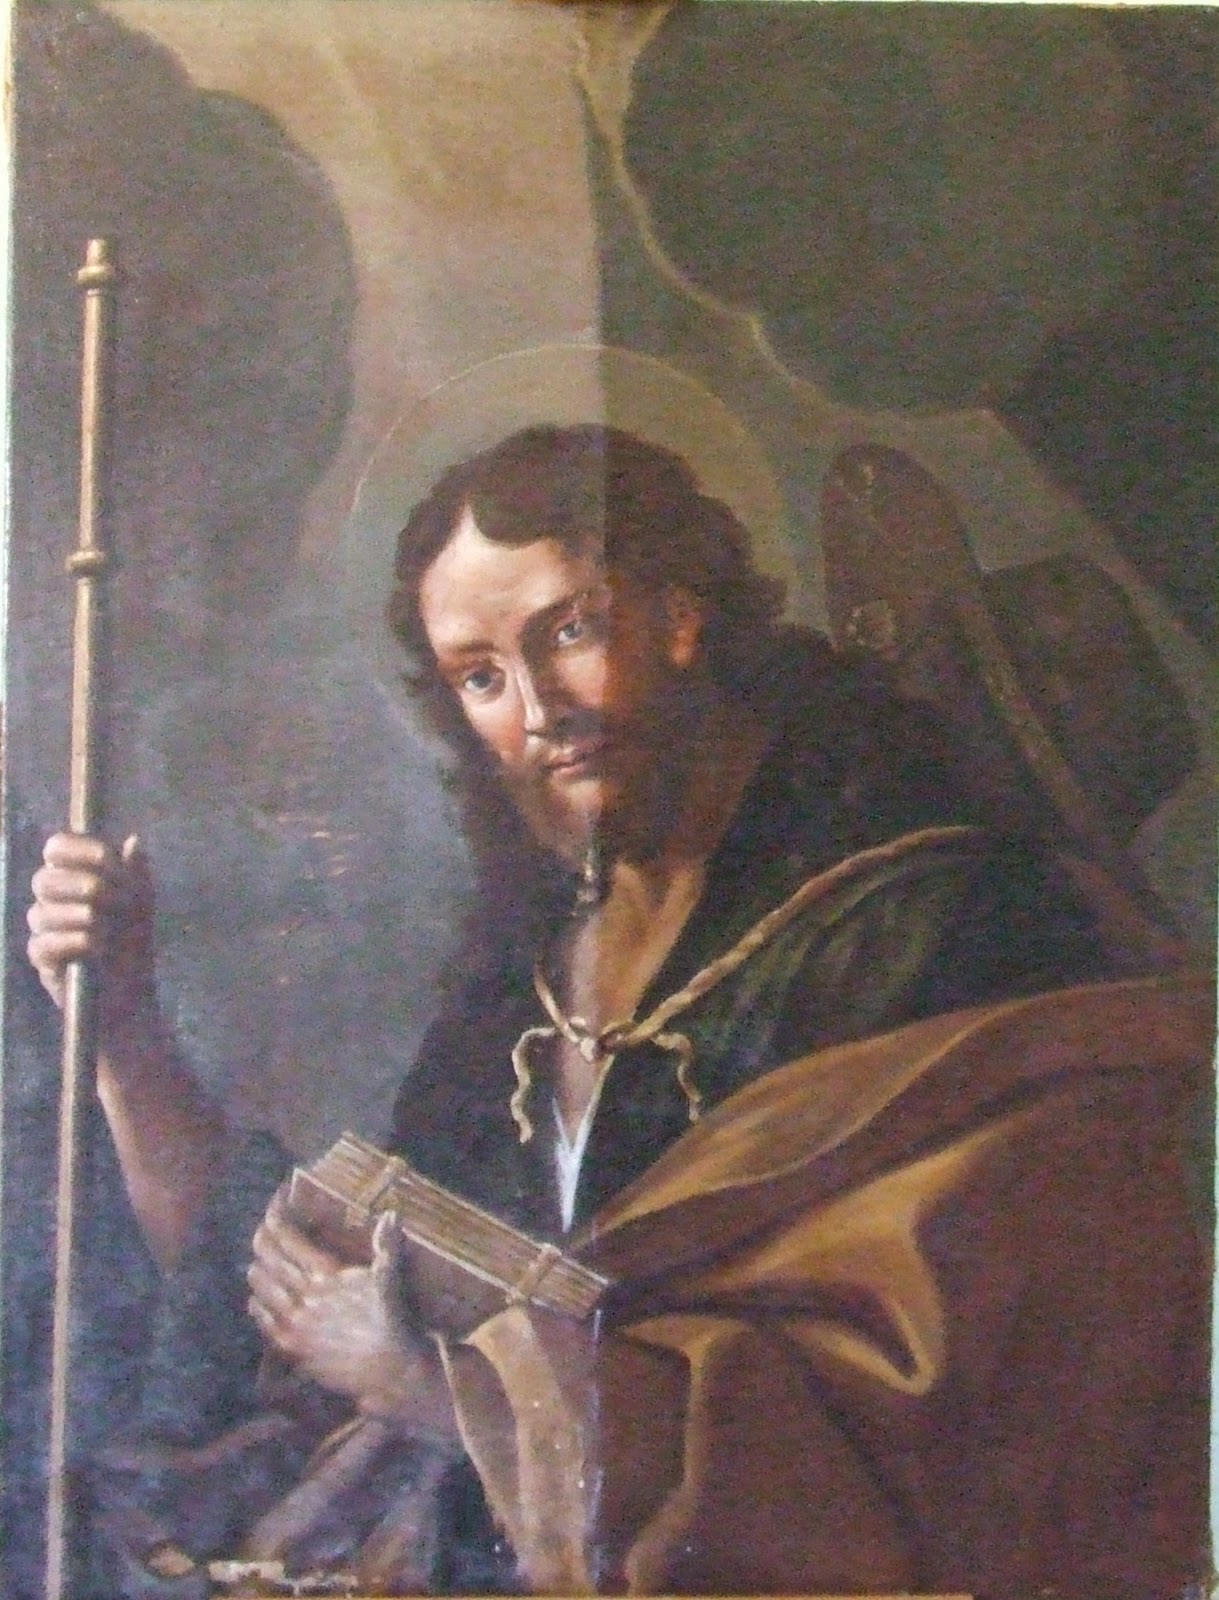
The canvas painting before and after the conservation- restoration treatments. 

This beautiful painting is a reproduction of another by the same subject, executed in the early 1620s by the Spanish artist, Jusepe de Ribera (1591-1652). Ribera’s painting, currently situated at the National Gallery in London, was influenced by the style of Caravaggio. 

Continue reading about the conservation treatments of this painting and its decorative frame, below:

Manufacturing Technique:

The painting is stretched on a stretcher frame. It appears that the original canvas is fairly thin, having a closed weave and being quite textured. It could be deduced that the material used for the support is probably cotton or linen. The painting seems to have a very thin preparatory layer, which is dark brown in colour. The medium used is probably oil, while the surface of the paint layer is textured, with areas having high impasto.

Visual observations deduced the presence of a very thick and dark varnish layer. Investigations using ultra violet light resulted in a green fluorescence thus confirming the presence of this stratum as being of organic material. 

Past Restorations and State of Conservation:
The painting was lined in the past. Observations indicate that this restoration was carried out fairly recently, most probably in the past ten years. The lining canvas is still fulfilling its purpose in supporting the original canvas.


A general photograph of the verso of the canvas painting, showing the lining canvas.

 The preparatory and paint layers have suffered from extensive damage in the past. The paint layer is abraded in turn exposing the underlying canvas weave. It can be hypothesized that the painting has suffered damage during the lining procedure which was carried out during the past restoration intervention, due to a high heat used.  


Abrasions of the paint layer around and on Jesus Christ’s hand.

Under investigations using ultra violet light, old retouchings and overpainting were observed giving off a black fluorescence. 

The varnish layer present had oxidised into a dark, brown layer which was obscuring heavily the paint layer, and interfering with the aesthetic quality of the painting. 

Conservation-Restoration Treatments:

Cleaning of the paint layer
The painting was temporarily un-mounted from the decorative frame. Preliminary cleaning tests were carried out, and their result was observed in normal light and under ultra violet fluorescence. The cleaning tests were carried out using mixtures of organic solvents, solvent gels, and emulsions. Aqueous solutions ranging from a pH of 6.5 to 8.5 were also tested. 

The varnish and old retouchings proved to be stubborn to most of the reagents used during the preliminary cleaning tests. Various mixtures of organic solvents had to be used, in some cases rendered in a solvent gel using hydroxypropylcelulose. In some cases, thick encrustations were removed using a scalpel blade.

During the removal of varnish from the paint layer.

Infilling of lacunae
The minor losses in the preparatory and paint layers, were infilled with a prepared mixture of Gesso di Bologna (calcium sulfate) and Rabbit-skin Glue. The infills were then levelled down to the surface of the painting using a scalpel blade. 

Pictorial Reintegration
The painting was given a layer of a synthetic varnish, which has two main functions i.e. that of saturating the colours, and acting as an intermediate layer between the paint layer and the successive retouching intervention.

Pictorial reintegration was subsequently carried out on lacunae and on the abrasions of the paint layer, using reversible varnish colours.

During the process of pictorial reintegration.

Final protective layer
A thin, synthetic and reversible protective coating was applied in spray form, to primarily protect the surface from any future mechanical damage and foreign deposits accumulation.

Treatments of the Decorative Frame
The decorative frame was surface cleaned from the accumulated dust and grime. Any cracks and lacunae present were then consolidated using an organic adhesive. The cracks and other lacunae were infilled using a mixture of Gesso di Bologna (calcium sulfate) and Rabbit-skin Glue using a spatula. These infills were then levelled down to the surface of the frame or else carved following the design.

During the process of surface cleaning of the decorative frame.

Since the decorative frame was originally commercially gilded, the infills were then reintegrated using a liquid metal which does not tarnish with time. The decorative frame was finally given a protective coating of synthetic varnish in spray form.

The painting was then re-mounted inside the decorative frame. 

Images and text are copyright Sarah Yeomans Gafa` 2016. 


Thursday, September 8, 2016

17th century "St. James" Canvas Painting by a School of Mattia Preti (1613-1699)

The St. James canvas painting before and after conservation-restoration treatments.

It was a great delight and satisfaction to work on this precious work of art. Its conservation project resulted in a fruitful learning experience. 

The painting represents an image of St. James the Great, depicted as a pilgrim father. Both the painting technique used and the style of the composition, confirm that the artist who depicted this painting was very close to the works of the Calabrian artist, Mattia Preti. Most probably, he was active in his circle or was one of his followers. Mattia Preti (born 24th February, 1613 in Taverna, Calabria, Italy, and died 3rd January, 1699, in Valletta, Malta), arrived in Malta in 1659, and was commissioned for highly important masterpieces by the Knights of St. John of Jerusalem, the Church and also for private collections.

Keep on reading to learn about this interesting conservation project:


Manufacturing Technique: 
The auxiliary support the painting is stretched on, is a strainer frame, and it is highly probable the original one used by the artist. The canvas painting was stretched by means of wooden tacks, which are typical of the late 16th, 17th, and 18th centuries. From observations, and also considering the date of the painting, it can be deduced that the canvas used is linen, and it was probably hand made. 


A general view of the painting’s verso, showing the original canvas support.

Photograph under 10x magnification, of the canvas support through a lacunae. It shows the open weave and rough texture of this stratum.

The preparatory layer is reddish-brown in colour, which is very typical of paintings created in the 17th and 18th centuries. 

The medium used in the paint layer seems to be oil. The pallette used by the artist is very typical of 17th century artists, in using mainly earth colours and ochres. The artist made use of the reddish hue of the preparatory layer, to render shadows and drapery folds.

Non-invasive scientific investigations using ultra violet fluorescence revealed the presence of a thick and homogenous varnish layer, which gave off a green fluorescence. However, the varnish layer is probably not original. 


Past Restorations and State of Conservation: 
The strainer frame appeared to be rather sturdy considering its age. However, it had various insect flight holes throughout its members. The insect infestation appears to be inactive, since no frass was observed. 

The canvas support is still in fairly good condition and was adequately taut onto the strainer. It however exhibited some losses and tears which were being caused by an accumulation of foreign deposits in between the painting’s verso and the strainer, causing pressure to the front of the painting and in turn creating this deterioration. Moreover, the tacking margins had also deteriorated. 

A network of ageing cracks (known as craquelure) and cupping, were being demonstrated by the preparatory and paint layers. Some minor flaking of the paint layer was also occurring, while losses of these strata were also observed. During a past restoration intervention, overpainting was applied over all the original paint layer of the background. The past restorer also carried out retouchings in the form of hatching lines, probably to enhance the shadows and drapery folds. These overpaintings were all detected during observations under ultra violet light.


An example of cupping and flaking of the paint layer on the yellow mantle.

Photographs under ultra violet light, showing overpainting and old retouchings on the face.

The varnish layer present had aged and yellowed due to the process of oxidation and polymerisation of the organic resin. Along with the overpainting, it was obscuring heavily the original hues of the paint layer as was intended by the artist. 


Conservation-Restoration Treatments:

Cleaning and Consolidation
Cleaning tests were carried out in order to tailor for the removal of the oxidised varnish and overpainting, and were carried out under ultra violet light. Following the cleaning of the paint layer, a very thin and synthetic varnish layer was applied by brush. This served as a protection during the application of the following treatments.

Areas of the paint layer which were flaking were consolidated using a conservation- graded organic binder. The area was then subjected to heat and pressure using a heated spatula. 


The painting during cleaning, showing the removal of the old varnish and overpainting.

During the cleaning procedure of the painting while wearing an optivisor.

Mechanical Cleaning of the Painting's Verso
The painting was firstly un-mounted from the strainer, in order for the following treatments to be affected. Although it depends on the type of treatments planned, any “irregularities” and soiling within the canvas fibres, such as knots and deposits, need to be removed. These impurities were cleaned using a scalpel blade, a wishab, and soft brushes.


The accumulation of foreign deposits in between the strainer and the canvas, which were removed mechanically.

Improving Deformations of the Paint Layer
The cupping and craquelure exhibited by the paint layer needed to be improved. In order to carry out this treatment, moisture, heat and pressure need to be affected, thus, firstly the painting’s sensitivity to moisture and heat was tested. Moisture was applied through damp blotting paper (from the canvas side). The area was then ironed using a 5kg Conservation Iron, until the cupping and craquelure had visually improved. The painting was treated one area at a time.


During the improvement of deformations.

Inlays and Tear Repair
Lacunae of the canvas support were inlayed using a sized piece of canvas with a similar weave and texture to that of the original. During tear repair, the original yarns of the canvas around the tear were aligned, while the adhesive was applied under magnification. For the large tears, some new canvas threads were applied in order to further reinforce the tear.


During the application of canvas threads to tears in the canvas support.

Strip Lining procedure
A conservation- graded adhesive was applied by brush to the verso of the painting. This adhesive penetrated through all the strata serving as a consolidant. It also acted as an isolation layer, before the subsequent strip lining procedure.

During the strip lining, strips of new canvas with a similar weave and texture to that of the original, were adhered to the perimeter of the painting in order to reinforce the fragile and narrow tacking margins, and thus, enabling the conservator- restorer to subsequently re-stretch the painting onto the auxiliary frame.


Examples of the tacking margins after strip lining. 

Re-stretching the Painting
The strainer was cleaned from any accumulation of dust and grime. In order to eliminate any larvae within the wood and to prevent future insect infestation, the strainer was disinfected using a conservation- graded insecticide. 

The painting was re-stretched onto the strainer using metallic (non-iron) staples.

Reintegration of Lacunae
The losses present in the preparatory and paint layers, were infilled with a prepared mixture of Gesso di Bologna (calcium sulfate) and an organic binder. The painting was then given a layer of a synthetic varnish.


General view of the painting after infilling of lacunae in the paint layer and varnishing.

Pictorial reintegration was subsequently carried out on lacunae and any abrasions of the paint layer, using reversible varnish colours. In the case of large lacunae, these were reintegrated using the tratteggio spezzato (also refered to as Rigatino) technique. This reintegration is identifiable from close quarters, however, from a distance, the painting can be “read” as a whole. 

Final Protective Layer
A thin, synthetic and reversible protective coating was applied in spray form to act as a protection to the paint layer from mechanical damage and any future dust accumulation. 


General view of the painting after all the conservation- restoration treatments were completed.

Images and text are copyright Sarah Yeomans Gafa` 2016.