

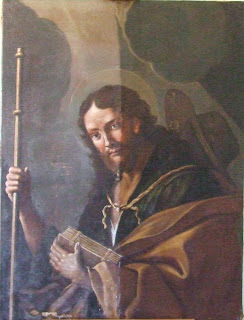
The St. James canvas painting before and after conservation-restoration treatments.
The painting represents an image of St. James the Great, depicted as a pilgrim father. Both the painting technique used and the style of the composition, confirm that the artist who depicted this painting was very close to the works of the Calabrian artist, Mattia Preti. Most probably, he was active in his circle or was one of his followers. Mattia Preti (born 24th February, 1613 in Taverna, Calabria, Italy, and died 3rd January, 1699, in Valletta, Malta), arrived in Malta in 1659, and was commissioned for highly important masterpieces by the Knights of St. John of Jerusalem, the Church and also for private collections.
Manufacturing Technique:
The auxiliary support the painting is stretched on, is a strainer frame, and it is highly probable the original one used by the artist. The canvas painting was stretched by means of wooden tacks, which are typical of the late 16th, 17th, and 18th centuries. From observations, and also considering the date of the painting, it can be deduced that the canvas used is linen, and it was probably hand made.


The preparatory layer is reddish-brown in colour, which is very typical of paintings created in the 17th and 18th centuries.
The medium used in the paint layer seems to be oil. The pallette used by the artist is very typical of 17th century artists, in using mainly earth colours and ochres. The artist made use of the reddish hue of the preparatory layer, to render shadows and drapery folds.
Non-invasive scientific investigations using ultra violet fluorescence revealed the presence of a thick and homogenous varnish layer, which gave off a green fluorescence. However, the varnish layer is probably not original.
Past Restorations and State of Conservation:
The strainer frame appeared to be rather sturdy considering its age. However, it had various insect flight holes throughout its members. The insect infestation appears to be inactive, since no frass was observed.
The canvas support is still in fairly good condition and was adequately taut onto the strainer. It however exhibited some losses and tears which were being caused by an accumulation of foreign deposits in between the painting’s verso and the strainer, causing pressure to the front of the painting and in turn creating this deterioration. Moreover, the tacking margins had also deteriorated.
A network of ageing cracks (known as craquelure) and cupping, were being demonstrated by the preparatory and paint layers. Some minor flaking of the paint layer was also occurring, while losses of these strata were also observed. During a past restoration intervention, overpainting was applied over all the original paint layer of the background. The past restorer also carried out retouchings in the form of hatching lines, probably to enhance the shadows and drapery folds. These overpaintings were all detected during observations under ultra violet light.


The varnish layer present had
aged and yellowed due to the process of oxidation and polymerisation of the organic resin. Along with the overpainting, it was obscuring heavily the original hues of the paint layer as was intended by the artist.
Conservation-Restoration Treatments:
Cleaning and Consolidation
Cleaning tests were carried out in order to tailor for the removal of the oxidised varnish and overpainting, and were carried out under ultra violet light. Following the cleaning of the paint layer, a very thin and synthetic varnish layer was applied by brush. This served as a protection during the application of the following treatments.
Areas of the paint layer which were flaking were consolidated using a conservation- graded organic binder. The area was then subjected to heat and pressure using a heated spatula.


Mechanical Cleaning of the Painting's Verso
The painting was firstly un-mounted from the strainer, in order for the following treatments to be affected.

Improving Deformations of the Paint Layer
The cupping and craquelure exhibited by the paint layer needed to be improved. In order to carry out this treatment, moisture, heat and pressure need to be affected, thus, firstly the painting’s sensitivity to moisture and heat was tested. Moisture was applied through damp blotting paper (from the canvas side). The area was then ironed using a 5kg Conservation Iron, until the cupping and craquelure had visually improved. The painting was treated one area at a time.

Inlays and Tear Repair
Lacunae of the canvas support were inlayed using a sized piece of canvas with a similar weave and texture to that of the original. During tear repair, the original yarns of the canvas around the tear were aligned, while the adhesive was applied under magnification. For the large tears, some new canvas threads were applied in order to further reinforce the tear.

Strip Lining procedure
A conservation- graded adhesive was applied by brush to the verso of the painting. This adhesive penetrated through all the strata serving as a consolidant. It also acted as an isolation layer, before the subsequent strip lining procedure.
During the strip lining, strips of new canvas with a similar weave and texture to that of the original, were adhered to the perimeter of the painting in order to reinforce the fragile and narrow tacking margins, and thus, enabling the conservator- restorer to subsequently re-stretch the painting onto the auxiliary frame.

Re-stretching the Painting
The strainer was cleaned from any accumulation of dust and grime. In order to eliminate any larvae within the wood and to prevent future insect infestation, the strainer was disinfected using a conservation- graded insecticide.
The painting was re-stretched onto the strainer using metallic (non-iron) staples.
Reintegration of Lacunae
The losses present in the preparatory and paint layers, were infilled with a prepared mixture of Gesso di Bologna (calcium sulfate) and an organic binder. The painting was then given a layer of a synthetic varnish.

Pictorial reintegration was subsequently carried out on lacunae and any abrasions of the paint layer, using reversible varnish colours. In the case of large lacunae, these were reintegrated using the tratteggio spezzato (also refered to as Rigatino) technique. This reintegration is identifiable from close quarters, however, from a distance, the painting can be “read” as a whole.
Final Protective Layer
A thin, synthetic and reversible protective coating was applied in spray form to act as a protection to the paint layer from mechanical damage and any future dust accumulation.

Images and text are copyright Sarah Yeomans Gafa` 2016.
The auxiliary support the painting is stretched on, is a strainer frame, and it is highly probable the original one used by the artist. The canvas painting was stretched by means of wooden tacks, which are typical of the late 16th, 17th, and 18th centuries. From observations, and also considering the date of the painting, it can be deduced that the canvas used is linen, and it was probably hand made.

A general view of the
painting’s verso, showing the original canvas support.

Photograph under 10x
magnification, of the canvas support through a lacunae. It shows the open weave
and rough texture of this stratum.
The preparatory layer is reddish-brown in colour, which is very typical of paintings created in the 17th and 18th centuries.
The medium used in the paint layer seems to be oil. The pallette used by the artist is very typical of 17th century artists, in using mainly earth colours and ochres. The artist made use of the reddish hue of the preparatory layer, to render shadows and drapery folds.
Non-invasive scientific investigations using ultra violet fluorescence revealed the presence of a thick and homogenous varnish layer, which gave off a green fluorescence. However, the varnish layer is probably not original.
Past Restorations and State of Conservation:
The strainer frame appeared to be rather sturdy considering its age. However, it had various insect flight holes throughout its members. The insect infestation appears to be inactive, since no frass was observed.
The canvas support is still in fairly good condition and was adequately taut onto the strainer. It however exhibited some losses and tears which were being caused by an accumulation of foreign deposits in between the painting’s verso and the strainer, causing pressure to the front of the painting and in turn creating this deterioration. Moreover, the tacking margins had also deteriorated.
A network of ageing cracks (known as craquelure) and cupping, were being demonstrated by the preparatory and paint layers. Some minor flaking of the paint layer was also occurring, while losses of these strata were also observed. During a past restoration intervention, overpainting was applied over all the original paint layer of the background. The past restorer also carried out retouchings in the form of hatching lines, probably to enhance the shadows and drapery folds. These overpaintings were all detected during observations under ultra violet light.

An example of cupping and flaking of the
paint layer on the yellow mantle.

Photographs under ultra
violet light, showing overpainting and old retouchings on the face.
Cleaning and Consolidation
Cleaning tests were carried out in order to tailor for the removal of the oxidised varnish and overpainting, and were carried out under ultra violet light. Following the cleaning of the paint layer, a very thin and synthetic varnish layer was applied by brush. This served as a protection during the application of the following treatments.
Areas of the paint layer which were flaking were consolidated using a conservation- graded organic binder. The area was then subjected to heat and pressure using a heated spatula.


The painting during cleaning, showing the removal of the old varnish and overpainting.

During the cleaning procedure
of the painting while wearing an optivisor.
The painting was firstly un-mounted from the strainer, in order for the following treatments to be affected.

The accumulation of foreign
deposits in between the strainer and the canvas, which were removed mechanically.
Improving Deformations of the Paint Layer
The cupping and craquelure exhibited by the paint layer needed to be improved. In order to carry out this treatment, moisture, heat and pressure need to be affected, thus, firstly the painting’s sensitivity to moisture and heat was tested. Moisture was applied through damp blotting paper (from the canvas side). The area was then ironed using a 5kg Conservation Iron, until the cupping and craquelure had visually improved. The painting was treated one area at a time.

During the improvement of
deformations.
Inlays and Tear Repair
Lacunae of the canvas support were inlayed using a sized piece of canvas with a similar weave and texture to that of the original. During tear repair, the original yarns of the canvas around the tear were aligned, while the adhesive was applied under magnification. For the large tears, some new canvas threads were applied in order to further reinforce the tear.

During the application of
canvas threads to tears in the canvas support.
A conservation- graded adhesive was applied by brush to the verso of the painting. This adhesive penetrated through all the strata serving as a consolidant. It also acted as an isolation layer, before the subsequent strip lining procedure.
During the strip lining, strips of new canvas with a similar weave and texture to that of the original, were adhered to the perimeter of the painting in order to reinforce the fragile and narrow tacking margins, and thus, enabling the conservator- restorer to subsequently re-stretch the painting onto the auxiliary frame.

Examples
of the tacking margins after strip lining.
The strainer was cleaned from any accumulation of dust and grime. In order to eliminate any larvae within the wood and to prevent future insect infestation, the strainer was disinfected using a conservation- graded insecticide.
The painting was re-stretched onto the strainer using metallic (non-iron) staples.
The losses present in the preparatory and paint layers, were infilled with a prepared mixture of Gesso di Bologna (calcium sulfate) and an organic binder. The painting was then given a layer of a synthetic varnish.

General
view of the painting after infilling of lacunae in the paint layer and
varnishing.
Pictorial reintegration was subsequently carried out on lacunae and any abrasions of the paint layer, using reversible varnish colours. In the case of large lacunae, these were reintegrated using the tratteggio spezzato (also refered to as Rigatino) technique. This reintegration is identifiable from close quarters, however, from a distance, the painting can be “read” as a whole.
A thin, synthetic and reversible protective coating was applied in spray form to act as a protection to the paint layer from mechanical damage and any future dust accumulation.

General view of the
painting after all the conservation- restoration treatments were completed.
Images and text are copyright Sarah Yeomans Gafa` 2016.
Walls are not just plain backgrounds; they are like blank canvases that you can transform with your style and creativity. Canvas painting are a simple and stylish way to upgrade your walls. Let’s explore how you can give your walls a fresh look using canvas paintings..
ReplyDelete